Blue Robot Cricut Susan Inkscape Sure Cuts Alot Remove From Outline Mode
You are probably wondering why you would want to know how to do this. Well, I'll tell you, if you have a Cricut and SCAL software you will be able to cut it, that's why! I found a cute bunny pattern over at familyfun.com and cut it with my cricut to make this cute card:

Don't worry if you don't have a cricut, you can print out the pattern, cut out the bunny and trace it on a folded sheet of cardstock and cut it out to make your card that way. But if you have a cricut this is a good trick to know because so many patterns are available for free in pdf format!
You will need a cricut machine, Sure Cuts a Lot software (SCAL) and a free program called Inkscape for this tutorial.
Step 1. Go here to find the bunny pattern, click the image so you can see it full size, it is on page 2 of the pdf file. Zoom in on the right hand bunny and press the "print screen" key on your keyboard.
Open your image editing software (I use Paint Shop Pro but photoshop is fine too) and go under edit and paste as a new image.


Now save this file as bunny.jpg. Open Inkscape and open the bunny.jpg, choose the arrow on the top of left hand tool bar. click on the bunny, you will see a box with arrows at the corners and on the sides of the box around the bunny.
Save the file.
*Note: If the pattern you are converting is low quality or hand drawn go under path again and choose "simplify". That will smooth out any bumps and give you a quick, clean cut. This pattern was so clean that I did not have to do this. Using the simplify function can distort your image a bit so only use it on low quality (pixalated) or hand drawn images.

Now you have converted a pfd file into an svg! This method will work with anything you can see on your screen so if you make a design in another program you can convert that too! How fun!
This is how to get this file into SCAL so you can cut it with your cricut. Open scal, under file choose import svg, then select you file and open it! Easy peasy!
There you have it. It wasn't so hard. Now you can cut dang near anything with your cricut. Leave me a comment if you get stuck, I'm happy to help.
Until next time happy crafting!
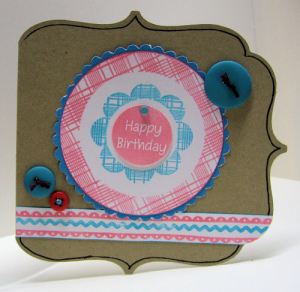
I appreciate all of your get well wishes and I am happy to say that I am back to normal (I wish I could say the same for the house!) I took a break from the never-ending pile of laundry and household disinfecting to craft and share this little card. It combines 3 of my favorite things (excepting my family of course) Stamps, Coffee and my Cricut!


I drew the card in inkscape so that I could cut it with my Cricut using SCAL software. I ran the band through a paper crimper to make it look more realistic and then stamped a little coffee mug from Inque Boutique on a punched circle.
For the SVG file click here.
For a printable template click here.
A note about blade depth and cutting pressure: Many cricut users I have come across keep their blade depth at 6 and their cutting pressure at max. Please don't do this. You will wear out your mats and blades much sooner than you need to and I suspect that eventually it will wear out your cricut. Only use the blade depth and pressure that you need. For the most part I keep my blade dept set at 3 and I vary the pressure I need to cut with. For instance when I cut vinyl I use pressure 2, pattern paper I use pressure 3 and on Stampin Up! cardstock I use pressure 5 (or MAX). My first cricut, the personal 6″x12″ model that I have used frequently for 2 years I used this way and recently it seems as though I need to have my blade depth at 4 now, 3 doesn't quite do the job anymore. So if you are using your machine at 6 and max pressure I fear that eventually It will not be able to cut through the thinnest of materials. If your pressure is to high and blade too deep you are just cutting into the mat anyway so give you poor cricut a break and only use the depth and pressure you need to keep that bug chirping for years to come!
Thanks for stopping by and happy crafting!
Hi all, Just a quick post to let you know there is a new freebie scrapbook kit at Peppermint Creative. And they are having a sale too! The boarders are cool, I may convert them to SVGs in Inkscape so I can cut them with my SCAL/Cricut. You can snag the kit here.

If you are a parent you are probably asked to provide "on-demand" coloring pages for you brood on a daily basis. Thanks to the wonders of the Internet you can find any character they would like with a quick Google search. So I thought to myself today "Hmmmm, I wonder if I could take these free coloring pages and convert then to SVG files so I can cut them with my Cricut using SCAL software." And guess what? I can, and I'll show you how to do it too! Also if you want a layered "Hello Kitty SVG file you can grab one at Candice's blog, but I just needed a simple outline so I had to make mine myself.)
I wanted to make name badges for my kids backpacks for the first day of school so I asked them who they wanted on their badges. Lila wanted "Hello Kitty"
Maizy wanted "Ariel"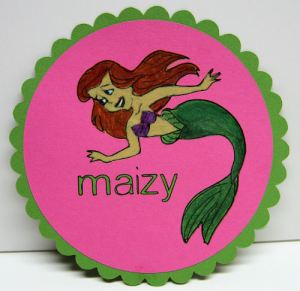
And Jack wanted "Spidy"
Note: If you have Cricut markers you can save yourself a lot of time, aggravation and paper. I'll explain when we get there. By now you know me, I like my aggravation:-)
Step 1 Find a coloring page. Type "free__________coloring page" in a search engine and choose from millions of images.
Step 2 Right Click on the image and "save as" and save it somewhere you can find it like the desktop.
Step 3 (only do this if you need to remove unwanted elements from the page such as extra characters like in Ariel or the rest of Spiderman's body.) Open up you image editing software (I use Paint Shop Pro but Photoshop will work too, if you don't have either try GIMP software, it's free, it's good I hear although I've never used it) Use you selection tool remove anything you do not want in the image. I like the Lasso tool but use whatever, you can even take away stray marks with the eraser tool. Save the image.
Step 4 open Inkscape (also a freebie) and select the "Arrow" in the upper left colum of tools. Click on your image. Click on the Path menu (top center of workspace) then click "Trace bitmap". A window will open, click update and you will see your image in the window. Click OK and close the window. Now you will see your image with resizing arrows in a box around it. Click path, the "Object to path". Now Save it and make sure it is saved as an SVG file. Such as Ariel.svg
Step 5 Open SCAL and under file click "import SVG" choose your file and it will appear on the SCAL/Cricut cutting mat. Resize and hit "Cut".
That's all there is to it! Now about the markers. Some cartoons are very detailed and the Cricut can cut them but it's a pain to glue and stick tiny little cut out features, So I reccomend using a marker before you cut. For example on the mermaid (I freehand drew it but it would look much better had I done it with a cricut marker) put the marker in the blade holder in the cricut and click "cut". Take out the marker and put back the blade. Under the Properties box in SCAL change the style to blackout then press "cut." You will have a perfectly drawn and cut image. Wish I thought of that first!

To finish I used chalk to color hello kitty, colored pencils and metallic watercolors to color ariel and a sharpie to fill in the web on spidy. I used a 3-M gloss laminating sheet to laminate them and added eyelets with my Crop-A-Dial and string. This is the most impressed my children have ever been with my crafting! Happy Dance! I hope you enjoyed this tutorial and happy cutting!
I'll warn you, this post will be longer than usual so grab a frosty cold beverage and get comfy. As you know I love using my Sure Cuts A lot software (SCAL) with my Cricut. I just learned how to design my own files that I can cut with SCAL and my Cricut using a free program called Inkscape. I love the look of artisan shapes and thought "I'd like to have a cool bracket frame", well it was super easy to make in SCAL by welding 4 parenthesis brackets together (you could do it in Design Studio as well for that matter) but I also would like to share the file with others so they can resize it however they want so I make one in Inkscape and saved it as a SVG file so you can use it with SCAL and a Cricut and hopefully other die cutting machines. If you are scrappin it old school you can download Inkscape, resize the shape how you want it, print journaling in it if desired, print it on the paper of your choice, cut it out and put it on your card or layout. Easy Peasy! Here is a layout I did using my bracket frame, I glittered the frame and placed it over a pic of me and my daughters and I used the middle of the frame as my journaling block. I stamped some swirls around the edges using the large stamp in Inque Boutique's Storyboard set. I love how you get 2 shapes from one die cut (3 if you use the negative space around the frame!)


Then I decided a shaped card would be pretty so I imported my shape into SCAL and made it fill half the mat (I am using the original 6″x12″ Cricut) and clicked "weld" then I copy and pasted the shape again (to make sure bot halves of my card would be the same size) then I flipped my second shape (to keep the card symmetrical) clicked weld and overlapped the two shapes on the edges. That's also how I made the scallop card with the glitter in it.

Click here for the SVG file. I hope you enjoy it. If you have any trouble please leave me a comment and I'll try to help you. If you want to download Inkscape click here. If you don't have SCAL you can get it here, it's $70 but you can download a 10 free trial to see if you like it. The trial version will cut horozontal lines through your design as a watermark but you can see how well it works before you buy.
I also cut all of the flourishes, swirls and title in SCAL. Fonts used were all freebies: Victorian LET, Designs Galore and KR Swash Buckler.
Thanks for reading through this long post! Have a great weekend!
Source: https://thefrugalcrafter.wordpress.com/tag/inkscape/
0 Response to "Blue Robot Cricut Susan Inkscape Sure Cuts Alot Remove From Outline Mode"
Post a Comment